Related Posts Plugin for WordPress, Blogger...

Saturday, November 15, 2014

Pumpkin Rolls

 Ummmm hello! It's been a little while...the blogging might be slow but that doesn't mean the projects have stopped around here! I have about fifteen things I could post right now. Since the pumpkin rolls are the most fallish I'm doing these. 

They are deliciously sweet with a hint of pumpkin flavor and surprisingly easy. Perfect for your Thanks Giving dinner table.


My kids sat and watched them poof up..we were all curious to see if they would actually look like pumpkins..we were pleasantly surprised!


See...really pleased with the results!!  


And little helpers can get in on the action too, they feel so proud of themselves when they get to help.


       Pumpkin Rolls
  • ¾ cup whole milk, scalded
  • 1 cup canned pumpkin puree
  • ⅓ cup light brown sugar
  • ⅓ cup white sugar
  • 6 tablespoons butter
  • 1 egg
  • 1 tsp salt
  • 2 packages active dry yeast (1/2 ounces) plus 1 teaspoon white sugar
  • ¼ cup lukewarm water
  • 5 cups all-purpose flour
  • 15-20 pecan halves, sliced into 3 vertical sections
  • ¼ cup melted butter, optional
  • Instructions
  1. Pour hot milk in a mixing bowl, add butter and stir to melt. Add sugars, pumpkin puree, salt to the milk and combine well.
  2. In a small bowl proof yeast in a lukewarm water with a teaspoon sugar. When it gets foamy add to the pumpkin mixture, and add the egg, mix well.
  3. Add in flour gradually and mix with a wooden spoon until well combined. The dough will be sticky.
  4. If using electric mixer, attach a dough hook and beat the mixture until the dough itself pulls from the side of the bowl.
  5. Turn the dough out to a wooden board dusted with a little flour. Knead with hand for 1 minute. Form the dough into a ball shape, place in a greased bowl and cover with a cloth. Let it rise in a warm place until it doubles in volume, about 1 hr.
  6. Punch the dough to deflate and knead it for a few seconds on a wooden board. Cut the dough in half. Cut each half into about 15 pieces.
  7. Roll each piece into a ball shape with your hand. Flatten the piece with palm of your hand a little. Using a knife, give 8 cuts on the edge to mimic flower pedals but the leave center uncut.
  8. Poke the center with your finger to give a deep indentation, and repeat the same procedure to all the other pieces.
  9. Place them, 2" apart, on a baking pan lined with parchment paper or baking mat, and let them rise again to be doubled, about 45 minutes.
  10. Preheat oven 350ºF for 20 minutes.
  11. If the center indentation is not obvious on the rolls, poke them again with your finger.
  12. Brush with egg wash,  and bake for 9-12 minutes until the top gets slightly golden.
  13. Brush the rolls with melted butter or a little honey diluted with water to make it shine if you wish.
  14. Insert pecan slices on top to mimic pumpkin stem.

Enjoy some delicious pumpkin rolls for your Thanks Giving feast!


Wednesday, August 20, 2014

Quiet Book pages 1,2,3 and 4

 This has been a long time coming quiet book, like I mentioned before it was started before we moved and am now just finishing my first set of pages.  I will give fair warning...making a quiet book is not for the faint of heart! They are a lot of work but soooo worth it.


 The little personalized details are my favorite part...they take a little longer but why make your own if it's not "your own".


  Every quiet book needs an apple picking page..it was my favorite growing up and it looks so darn cute.  Their tiny fingers can pick the apples and load them up into the wagon.


 We live on the family farm and my boys absolutely loooove it!  They can't get enough of tractors, combines, spray planes, gators and surprisingly water trucks.  Yep water trucks we have a water truck that keeps the dust down during harvest and my boys love riding with their Grandpa in it...so of course the quiet book had to have it's very own water truck.


 I like for the pages to be hands on so I came up with a way to fill the truck up with water and it works pretty well...luckily their little fingers are pretty sticky and can grip the plastic to fill it up.


We don't have a lot of animals on the farm...just chickens as of this spring but every good farm quiet book needs a barn full of animals.  These are finger puppet animals and went together really quickly if you're interested in a quick project.  The little chicks on top are hiding behind their eggs.


 Last but not least they crop duster page...this airplane took ummm way too long!  I kept not liking the way it was looking so I added more and more which is usually a bad idea but I quite like the way in turned out.. it's growing on me.  The row of beets I absolutely love and they were pretty quick.


 My favorite part is that you can pull them out of the ground...my boys love this feature also.


 A whole row of cute little sugar beets.


 And of course a close up of the plane that was almost a disaster! It is triple layered and stuffed so they can pull it off and fly it around.


And next up for the quiet book...miniature clothes pins and this fabric that was given to me..we'll see what happens.

With the kids back in school hopefully I can find some spare time to post all of the projects we have been up too including the rest of the quiet book! You may have noticed my pics are a little higher quality...eeeek, umm yeah my uncle just gave me his Canon Rebel dslr!!! 
 Now to figure out how to use it.

Tuesday, July 8, 2014

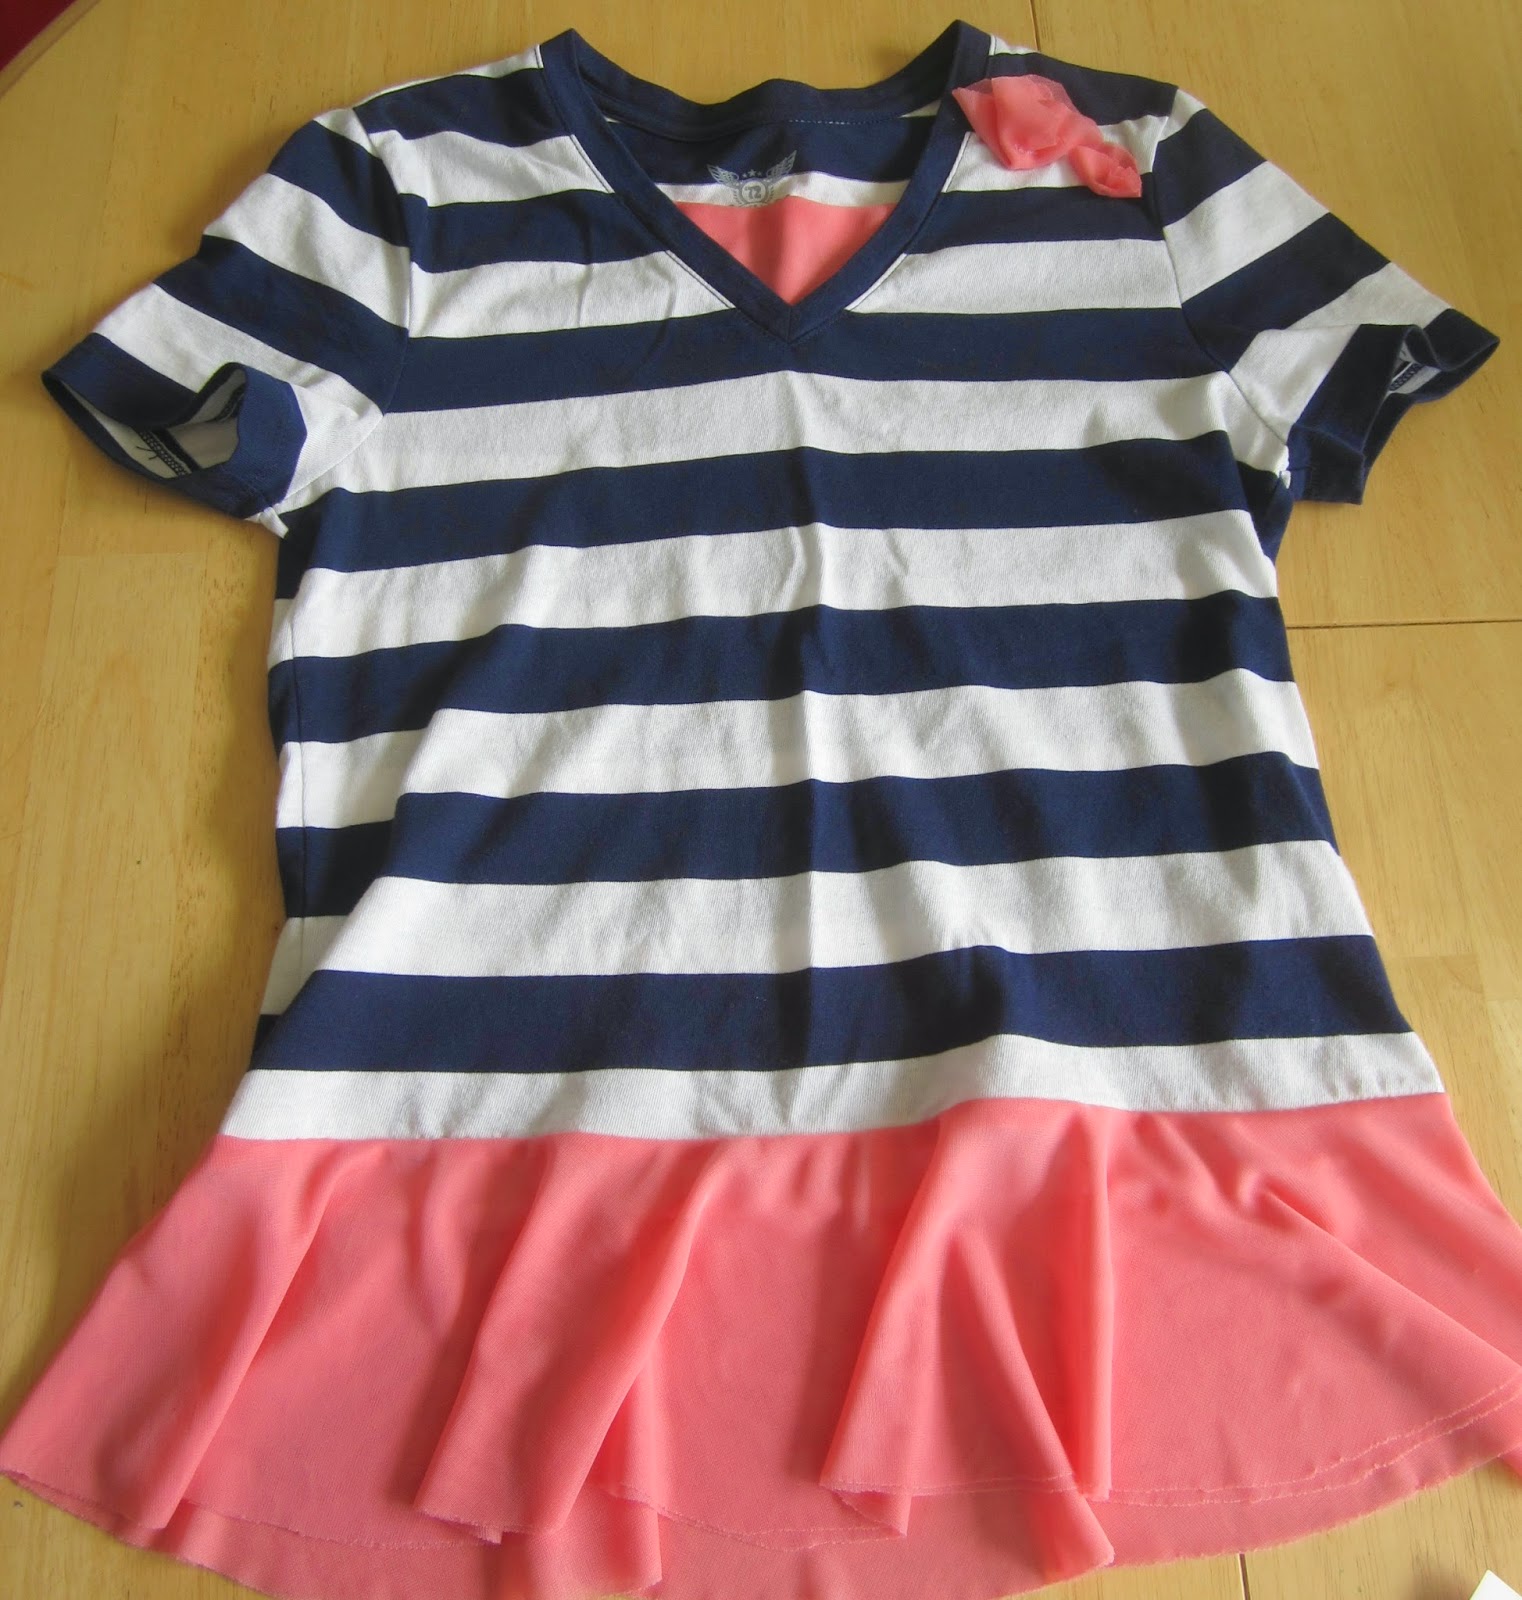
Peplum Shirt Refashion

 I decided to make matching peplum tops for my girls and I love the way they turned out.  The hardest part was figuring out the math..I may need a little refresher in Geometry.


Of course they love how flowy and twirly they are. This fabric was cheap, cheap so I bought the entire bolt...maybe I will need a matching flowy skirt.


 They went together really quickly after I figured out the math and the best part...no hemming and I even got away with no ironing :)


 I couldn't find any shirts in the little girl's section that fit the bill so I found these in the women's dept. They were a little big but I figured they could wear them longer that way.  Added a couple flowers and  just a little fabric at the top to tie in the color.


 This fabric is seriously the best..I may have to make some flowers for their hair to match.  It just ruffled up all perfect and...well flower like.
If you're interested in making a peplum top click on read more for the tutorial.

Tuesday, July 1, 2014

The Very Hungry Caterpillar Kid Craft

 Soooo summer is super busy and also SUPER FUN!! We have been having a fabulous time just chillaxin, swimming, getting sun burnt (me), making popsicles...and crafting up a storm. 
Yay us!


 My little girl has been browsing my kid craft Pinterest boards and is very ambitious...she managed to pull this one off in about an hr. We made our caterpillar out of an old oatmeal canister and painted it with acryllics.We cut all of the food out of a mixture of felt and foam...just what we had on hand.


All my kids have been enjoying this one, especially my youngest he thinks it is too fun to put the food in himself as we read through the story.


I have tons of projects ready to be posted...living room collage wall, peplum shirts for my girls, farm quiet book and curtains with DIY rods...so I will be back soon.

Wednesday, May 28, 2014

Ruler Necklace Teacher Gift

 I am loving the way our teacher gifts turned out so I had to share even though it's a little late. I saw something similar on Pinterest and had to make it my own. 


 We thought a little apple charm would be kinda cute but couldn't find any so my genius Mom suggested we make them out of Sculpey and they turned out soooo cute! I will do a separate post on sculpey charms cuz we will for sure be making more.

 
 I bought my ruler and chain at Wal Mart for cheap...under a dollar for both. And used a hand saw to cut them into one inch sections. I stained mine with a light stain just to make the wood grain stand out a little more, then attached the metal loop to the top with super glue.  I had these on hand but you can find them at most craft stores or you could drill a hole.

I attached a little note on the back with mod podge and then gave the whole thing a couple coats to make it shine a little.  For the apples a little spritz of clear gloss spray paint gave them a shine as well.  These were fun to make and hopefully our teachers enjoy them too!


Friday, May 23, 2014

Almond Nut and Seed Energy Bars

 We have been trying to eat a little more healthy around here which includes eating less sugar :(  I am a sugar addict so my new best friends are honey, real maple syrup and dark chocolate. When I find a recipe that includes at least one of these ingredients and looks like a cookie of sorts I'm all over it!


  They are really simple and no bake which is a win win in the summer...ummm yeah we don't have AC.


Of course you can change it up to your liking, throw in your favorites.


 Even this picky little toddler approved and yes, he's a boy and no, I most definitely will not be cutting his curls.


Oh and one of our new favorite snacks is frozen Greek yogurt with honey and blue berries...really yummy.


Almond Nut and Seed Energy Bars

1 cup oats 
3 cups nuts and seeds 
(suggested combination 1/2 cup sunflower seeds, 1/4 cup each cashew pieces, pumpkin seeds, almond slices and toasted watermelon seeds)
1/2 cup almond butter
1/4 cup honey
1/2 tsp vanilla

Line 8x8-inch pan with wax paper or tin foil, extending the paper over two opposing sides of pan to use as handles later. In a medium bowl, combine oats, nuts, and seeds. In a 2 quart saucepan over medium-low, heat the almond butter, honey and vanilla for about 5 minutes, stirring occasionally. Add oats, seeds and nuts to almond butter mixture and stir to evenly coat. Pour the mixture into the baking dish and pack firmly into an even layer. Let mixture stand until firm, about an hr.  Using wax paper handles lift out mixture. Cut into twelve rectangles  Store in refrigerator.  Makes 12 bars

We added craisins and some chocolate chips would be good too. 
Enjoy

Tuesday, April 22, 2014

The Ballerina Bag


 Spring is officially here at our house and yesterday felt like summer. We were outside all day soaking it up.  The kids managed to bake cookies,  sell all of them on the side of the rode along with bottled water, jump on trampoline with sprinkler underneath, go on a bike ride, play baseball, catch bugs and butterflies...I love summer! 

Oh...so the ballerina bag, yeah it's a bag with chubby baby ballerinas all over it and it looks like a sparkly tutu..no big deal. 


 My mother in law was downsizing her fabric stash and gave me a bunch of adorable prints like this one. Since it was a ballerina bag I thought one layer of ruffle would be easy and would look like a ballerina tutu.


 Aren't they precious? You can't tell in the picture but their little tutus are sparkly too.


 We are currently using the ballerina bag for piano books but it works great for church, dance or whatever suits your fancy.


I am in the process of making a farming quiet book for my boys..I started before we moved and am now just getting back to it but it is turning out sooo cute. More pics coming soon!

If you're interested in making a ballerina bag for yourself  (once again) I used Ashley's tutorial for her ruffled tote here.


Wednesday, March 26, 2014


 I painted my awesome table my husband made for me, he worked hard on this little table and I love it! So why do I call it a Swedish table? Well let me tell you...my Grandma's parents moved to the United States from Sweden in the early 1900's. A while back my Grandma was able to go back to Sweden to visit family.  While she was there with one of our relatives they said they had a table that her Dad made when he was young and had left behind. She was able to bring it back with her, what an awesome surprise and I know my Grandma treasured her table.  I have always admired it and so I had my husband make one for me.

 He had to cut each of these legs out and notch them in by hand.


While we were painting the table I decided this little shelf my husband made a while back could use a fresh coat...now what do  I put on it?


 The living room is coming together quite nicely.  I am going to attempt a collage on this bare wall above the couch..I don't know why it is intimidating me?! We'll see how it goes...

If you are interested in a Swedish table of your own click on read more

Thursday, February 27, 2014

My sister and I were browsing around Hobby Lobby (love that store) and I found this little yellow bird..she had to be mine. 


I have been wanting to recover the pillows on my couches for quite some time but haven't gotten around to it.  They have definitely seen better days and my living room could use a little pop of color on those brown couches.

I went with a green/blue color for the big pillows and yellow to match the bird for the smaller pillows.  I was going to make some yellow pillows but came across these already made, right color, great price and pattern and couldn't pass them up.


This pleated pillow does take some time but is very simple...just sewing straight line after straight line.  I am loving how it looks all put together, we'll see how it holds up with the abuse we give it.

 My husband just finished making this Swedish table for me, if I could ever decide what color to paint it I would post it..I'm thinking a nice light blue like the pillows or off white...

You can find the tutorial for the pleated pillow here.

Tuesday, January 28, 2014

Old Fashioned Rag Dolls

 These old fashioned rag dolls have been on my to do list for quite some time.  I decided they would make the perfect homemade Christmas gift for my girls so I got to work sewing while they were in school and hiding them before they got home (rather tricky).


  I hand embroidered their little faces on, and was quite pleased with the result..I don't have much experience with embroidering.


 They each ended up a little different which is kinda fun.


 The little details were my favorite part...you gotta love these sweet little mary janes on their feet.


 I thought a Peter Pan collar would be fun for one of them.


  My girls knew I was making the dolls they just didn't get to see them until Christmas morning so they gave me some input during the process...like I want mine to have long hair and a purple dress.

They have absolutely loved these little dollies and it makes my heart melt...in the end all the time and effort was definitely worth it.  

Like I mentioned before my camera was lost for quite some during the move so no tutorial for this one but Ashley over at www.makeit-loveit.com has an excellent one with printable pattern pieces.  I just made a few adjustments to personalize them. (I made their bodies slightly bigger and their legs a little bit shorter)


01 02