Related Posts Plugin for WordPress, Blogger...

Saturday, February 23, 2013

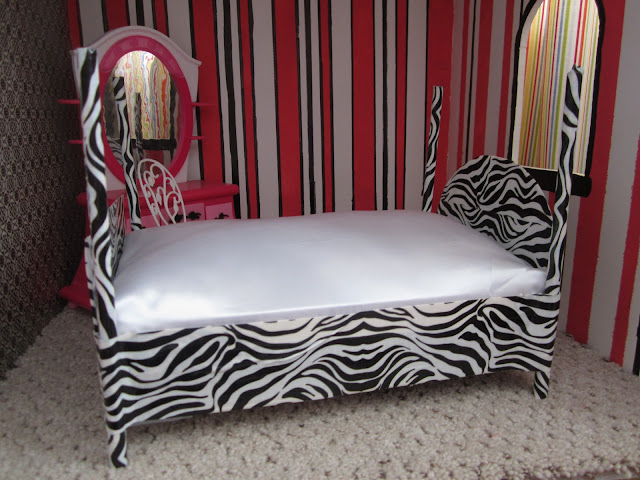
Diy Barbie Bed

My girls and I really enjoyed making this little bed for their doll house, it went together really quickly and  Is it just me or is it stinkin adorable!?!!  

I love the way it turned out and we made it in about 15 min.


Barbie really likes the way it turned out too... she's such a pampered princess!


 We went around the whole thing with a bit of tape to finish it off and cover all the cardboard and loose ends.


                                                         Blurry picture of the stuffing


 And a pink pillow to match...I think I need to makeover my poor little bedroom next...probably not with zebra print though!

Linking up http://www.craft-o-maniac.com/
Click on read more for the tutorial

Wednesday, February 20, 2013

Super Hero Cape Tutorial

 This cape took me about 15 min to make and only cost about $2.00 and that's not because I'm super fast or skilled it's just EASY!  As a mom of four this is the kind of project I can deal with.


My inspiration for this project was because I often find my little boy dressed up like this...


In his defense his big sister helps him into these lovely ensembles!


One of his favorite things in the summer is running in the dirt and seeing the trail of dust behind him.  He has been asking to run in the dirt a lot lately, sadly in the middle of February in Idaho that's not a possibility.  Now with his new fancy cape he can run and watch it fly behind him!


I think it's safe to say he loves his new cape


Getting the mail is much more fun when you're SUPER Dan


Simple felt logo

 You will need about one to two yards of fabric, depending on the size of your cape.  Mine only took 3/4 of a yard of each color.  Fold your fabric in half and use a fabric marker to make this shape with both pieces of fabric.


Then lay them out flat, right sides together and pin.


Now sew along the edge using a 1/4" seam allowance being sure to leave an opening on the bottom or side for turning right side out.

When you're finished sewing turn right side out and pin your opening closed and sew it up...you can just sew the opening shut or continue all the way around the cape to make it look nice an finished.

I used Velcro for the closure but you could use whatever you have on hand like snaps, button, tie, elastic..etc.

Now for the logo
  There are a lot of ways this can be done fabric paint and freezer paper, applique or when you're in a big hurry... felt and a glue gun!  I used this technique on my Incredibles Costumes about two years ago and they have held up really well, even going through the wash a lot. 

Make a  template out of paper,  lay it on the felt and trace around with a fabric marker, cut out and glue on cape with hot glue. (high temp.)


And that's it!
In about 15 min you have a great cape and happy little boy or girl!


   Linking up with http://www.craft-o-maniac.com/

Wednesday, February 13, 2013

Ice Cream Cone Chore Chart

I found this cute little ice cream cone scoop idea on Pinterest and put my own little spin on it.  Instead of putting it on the fridge with magnets we made a laminated sheet with velcro dots and hung it on her door.


Each scoop has a chore on the back and if they can't read a picture


There are velcro dots on the side to hold the scoops when the chores aren't done.


 Just so you know these chores are pretty simple like get dressed, make your bed, brush teeth, pick up toys etc.  She had so many we had to make it tilt over to the side...poor little Cinderella girl.

 You can draw your own or print out these shapes

I used scrap book paper and had it laminated at our Library.

Wednesday, February 6, 2013

Simple Valentine's Day Decorations


When it comes to decorating for Holidays like Valentine's Day I usually keep it pretty simple to nonexistent but this year I just left out my Apothecary Jars from Christmas, that I made a couple years ago...check them out here.   Fill the jars with some pink, red and white candy and they look perfect for Valentine's Day.


A neighbor gave us the Love Block a few years ago as a Christmas present, it is fairly simple to make, you can buy the metal cut outs at craft stores and attach them to a painted block...I have "Loved" mine but seriously I keep it out all year long.


The candy jars were a big hit with my kids so the candy is fading quickly...luckily I have a tall shelf that they can't get to so I moved them over from the piano and added a little heart garland that the kids enjoyed helping me make.


We cut out two sizes of hearts out of scrapbook paper and glued them together, punched two holes near the top and strung them onto a ribbon....very simple.


From Christmas Decor.  to Valentines...soooo easy!


Candy filled jars on the piano + toddlers = BAD idea!

01 02