Related Posts Plugin for WordPress, Blogger...

Sunday, September 20, 2015

Camping Quiet Book Pages


 I am happy to report the camping quiet book page is finally complete!  These little buggers take a lot longer than one would think. I think for the next couple pages I'm going to keep it really simple...whew this thing took FOREVER!!


But I will say the second my little boy is about to have a tantrum in the middle of church, this little puppy comes in really handy especially this page that has a million little things to do...like catch fish, build a fire, hang clothes on the line and I even made a fancy little camper guy that we lovingly named Cleetis (the name suits him rather well) that they can play with.  And you can get pretty creative too... like cooking fish over the fire or shoving the clothes in the tent or the laundry into the fish basket or having the farm animals from the other page come visit...


j

These really are a lot of work but also very rewarding to put together.  I can still remember playing with the one my Mom made for me and my siblings and have very fond memories of playing with it during those long church meetings. It really has been a lifesaver!  Sadly I don't have a tutorial to go along with this post but I hope you got some ideas at least.

Thursday, April 16, 2015

Vinyl Wallet For Little Boys

Kids are the funnest to sew for, they easily get excited over the smallest things like monster truck fabric!  I hope he stays this easy to please forever cuz it's sooo much fun. He's been a champ lately and has been saving his money up and wanted a place to keep it like his big sisters with all of their purses and bags. So we came up with this monster truck wallet and he loves it!


Really quite simple to throw together and doesn't require much fabric at all. If you have some various scraps laying around, they'll do the trick for this project.

It's lined with vinyl on the back in hopes to have it be a little more durable..boys tend to be a little rough on things. It also makes it a little more sturdy so it keeps it's shape a little better too. I bought about a yard of clear vinyl a few yrs back and have used it for a handful of projects..great stuff to have on hand ;)


And it folds right up so he can slip it in his back pocket or in the glove compartment of his new electric gator truck...yep he's pretty cool!


I thought it would be fun to make a pocket for a driver's license pic. You can't really tell but the orange frame has vinyl inside so you can put a photo in.


What you will need:

Two coordinating fabrics
Vinyl
Bias tape
and the usual scissors, thread, sewing machine... 

You'll want to start by cutting out your rectangles that will make the basic shape of your wallet.
Mine were 10 1/2 " by 5"
(cut one out of front fabric, one back fabric and one vinyl)

Now you can start on the pockets.  You can make it to your liking mine were.

Two 4" by 3" (monster truck fabric and orange framed vinyl)
One 3 1/2" by 4 1/2" (monster truck fabric)
One 3 1/2" by 4" (orange)
One 3 1/2" by 3" (orange)

That's a total of five pockets.


Any edges of pockets that will be showing need to be hemmed. I find it easiest to iron them down and then sew. Then you can start sewing them down to the big orange rectangle you cut out earlier.


Once your pockets are all sewn down it's time to sew all three rectangles together. Vinyl on bottom, outer fabric (monster truck) and then orange.


I found it easiest to tape mine together to hold them in place and then pin the bias tape around the entire thing and sew down. ( I tend to get excited at the end of a project and forget to take pics...sorry)


That's it! Your little boy will love you forever.
                                  

Wednesday, March 4, 2015

Raising Chickens For Beginners

  Last spring we got into the chicken business and it has been quite an adventure!  I grew up taking care of chickens on the farm and have been wanting to get some of my own for a while now.  We went into our local Cal-Ranch and each of my kids picked out their baby chick.  I had heard Rhode Island Reds were a good breed and they have proven that to be true.  They have been the best little chickens and regularly have eggs for me, even in the winter! They are nice as can be to boot.


The other two chicks we picked out were Ameraucana because I always loved the beautiful greeeny blue eggs they would lay and sometimes they even lay pink eggs....WHAT!!! That's a dream come true..or so I thought.  Our reds were laying consistent eggs and still no blue/green eggs and they were feisty (especially one of them) then we were hearing faint crowing ummm yep we got a rooster!  A really really feisty rooster that likes to attack my kids and I a lot...but mostly me :/ So we donated him to my Mom, who has a barn and a big run for him to get his wiggles out.  We are down to three chickens and only two that lay until..just this last month almost a year later we got a beautiful blue/green egg!!!! Ameraucana's mature later than most like up to 40 weeks but it was worth the wait. Just do a little research before you purchase your chicks to make sure you're getting what you want and be prepared for a rooster, apparently they get thrown into the bunch frequently.


We found a great little coop online for a decent price from Costco, it is a little snug for three chickens and was super snug for three chickens and a huge rooster. If you are looking to have more than three you would need something bigger than this.  We had planned on building our own but my husband was booked with work and my kids and I just couldn't wait. We just let them out a lot in the summer and their favorite hangout...the garden. (I'm in love with this pic)


If you are planning to get chicks in the spring, like we did be prepared to either have them inside or under a heat lamp until they get big enough to withstand the cold temps.  While you are picking out your chicks make sure and get some chick starter and we also got a two gallon waterer so they wouldn't be falling in and making a mess. Chickens poop a TON so be prepared and get some sort of bedding to keep them clean (we used pine wood shavings). While we are on the subject of poop...umm baby chicks get a condition called poopy butt (ok that's just what we called it).  It's for real and it happened to all four of our chicks.  This can be serious so be sure you treat them right away if you're noticing anything. Ours were very vocal about,  it's like they were chirping MY TUMMY HURTS!  We just gave them a little warm bath, my kids actually loved it.  They look so cute just standing in their bath just soakin their little bums for a while.  And I saved the best for last...you have to wipe them afterwards. YEP super gross but super necessary.


That's about it. We eventually put them on grain and let them roam around the yard in the summer to eat whatever they can find. We have had a lot of fun with them and have really been enjoying all of our farm fresh eggs!


Saturday, November 15, 2014

Pumpkin Rolls

 Ummmm hello! It's been a little while...the blogging might be slow but that doesn't mean the projects have stopped around here! I have about fifteen things I could post right now. Since the pumpkin rolls are the most fallish I'm doing these. 

They are deliciously sweet with a hint of pumpkin flavor and surprisingly easy. Perfect for your Thanks Giving dinner table.


My kids sat and watched them poof up..we were all curious to see if they would actually look like pumpkins..we were pleasantly surprised!


See...really pleased with the results!!  


And little helpers can get in on the action too, they feel so proud of themselves when they get to help.


       Pumpkin Rolls
  • ¾ cup whole milk, scalded
  • 1 cup canned pumpkin puree
  • ⅓ cup light brown sugar
  • ⅓ cup white sugar
  • 6 tablespoons butter
  • 1 egg
  • 1 tsp salt
  • 2 packages active dry yeast (1/2 ounces) plus 1 teaspoon white sugar
  • ¼ cup lukewarm water
  • 5 cups all-purpose flour
  • 15-20 pecan halves, sliced into 3 vertical sections
  • ¼ cup melted butter, optional
  • Instructions
  1. Pour hot milk in a mixing bowl, add butter and stir to melt. Add sugars, pumpkin puree, salt to the milk and combine well.
  2. In a small bowl proof yeast in a lukewarm water with a teaspoon sugar. When it gets foamy add to the pumpkin mixture, and add the egg, mix well.
  3. Add in flour gradually and mix with a wooden spoon until well combined. The dough will be sticky.
  4. If using electric mixer, attach a dough hook and beat the mixture until the dough itself pulls from the side of the bowl.
  5. Turn the dough out to a wooden board dusted with a little flour. Knead with hand for 1 minute. Form the dough into a ball shape, place in a greased bowl and cover with a cloth. Let it rise in a warm place until it doubles in volume, about 1 hr.
  6. Punch the dough to deflate and knead it for a few seconds on a wooden board. Cut the dough in half. Cut each half into about 15 pieces.
  7. Roll each piece into a ball shape with your hand. Flatten the piece with palm of your hand a little. Using a knife, give 8 cuts on the edge to mimic flower pedals but the leave center uncut.
  8. Poke the center with your finger to give a deep indentation, and repeat the same procedure to all the other pieces.
  9. Place them, 2" apart, on a baking pan lined with parchment paper or baking mat, and let them rise again to be doubled, about 45 minutes.
  10. Preheat oven 350ºF for 20 minutes.
  11. If the center indentation is not obvious on the rolls, poke them again with your finger.
  12. Brush with egg wash,  and bake for 9-12 minutes until the top gets slightly golden.
  13. Brush the rolls with melted butter or a little honey diluted with water to make it shine if you wish.
  14. Insert pecan slices on top to mimic pumpkin stem.

Enjoy some delicious pumpkin rolls for your Thanks Giving feast!


Wednesday, August 20, 2014

Quiet Book pages 1,2,3 and 4

 This has been a long time coming quiet book, like I mentioned before it was started before we moved and am now just finishing my first set of pages.  I will give fair warning...making a quiet book is not for the faint of heart! They are a lot of work but soooo worth it.


 The little personalized details are my favorite part...they take a little longer but why make your own if it's not "your own".


  Every quiet book needs an apple picking page..it was my favorite growing up and it looks so darn cute.  Their tiny fingers can pick the apples and load them up into the wagon.


 We live on the family farm and my boys absolutely loooove it!  They can't get enough of tractors, combines, spray planes, gators and surprisingly water trucks.  Yep water trucks we have a water truck that keeps the dust down during harvest and my boys love riding with their Grandpa in it...so of course the quiet book had to have it's very own water truck.


 I like for the pages to be hands on so I came up with a way to fill the truck up with water and it works pretty well...luckily their little fingers are pretty sticky and can grip the plastic to fill it up.


We don't have a lot of animals on the farm...just chickens as of this spring but every good farm quiet book needs a barn full of animals.  These are finger puppet animals and went together really quickly if you're interested in a quick project.  The little chicks on top are hiding behind their eggs.


 Last but not least they crop duster page...this airplane took ummm way too long!  I kept not liking the way it was looking so I added more and more which is usually a bad idea but I quite like the way in turned out.. it's growing on me.  The row of beets I absolutely love and they were pretty quick.


 My favorite part is that you can pull them out of the ground...my boys love this feature also.


 A whole row of cute little sugar beets.


 And of course a close up of the plane that was almost a disaster! It is triple layered and stuffed so they can pull it off and fly it around.


And next up for the quiet book...miniature clothes pins and this fabric that was given to me..we'll see what happens.

With the kids back in school hopefully I can find some spare time to post all of the projects we have been up too including the rest of the quiet book! You may have noticed my pics are a little higher quality...eeeek, umm yeah my uncle just gave me his Canon Rebel dslr!!! 
 Now to figure out how to use it.

Tuesday, July 8, 2014

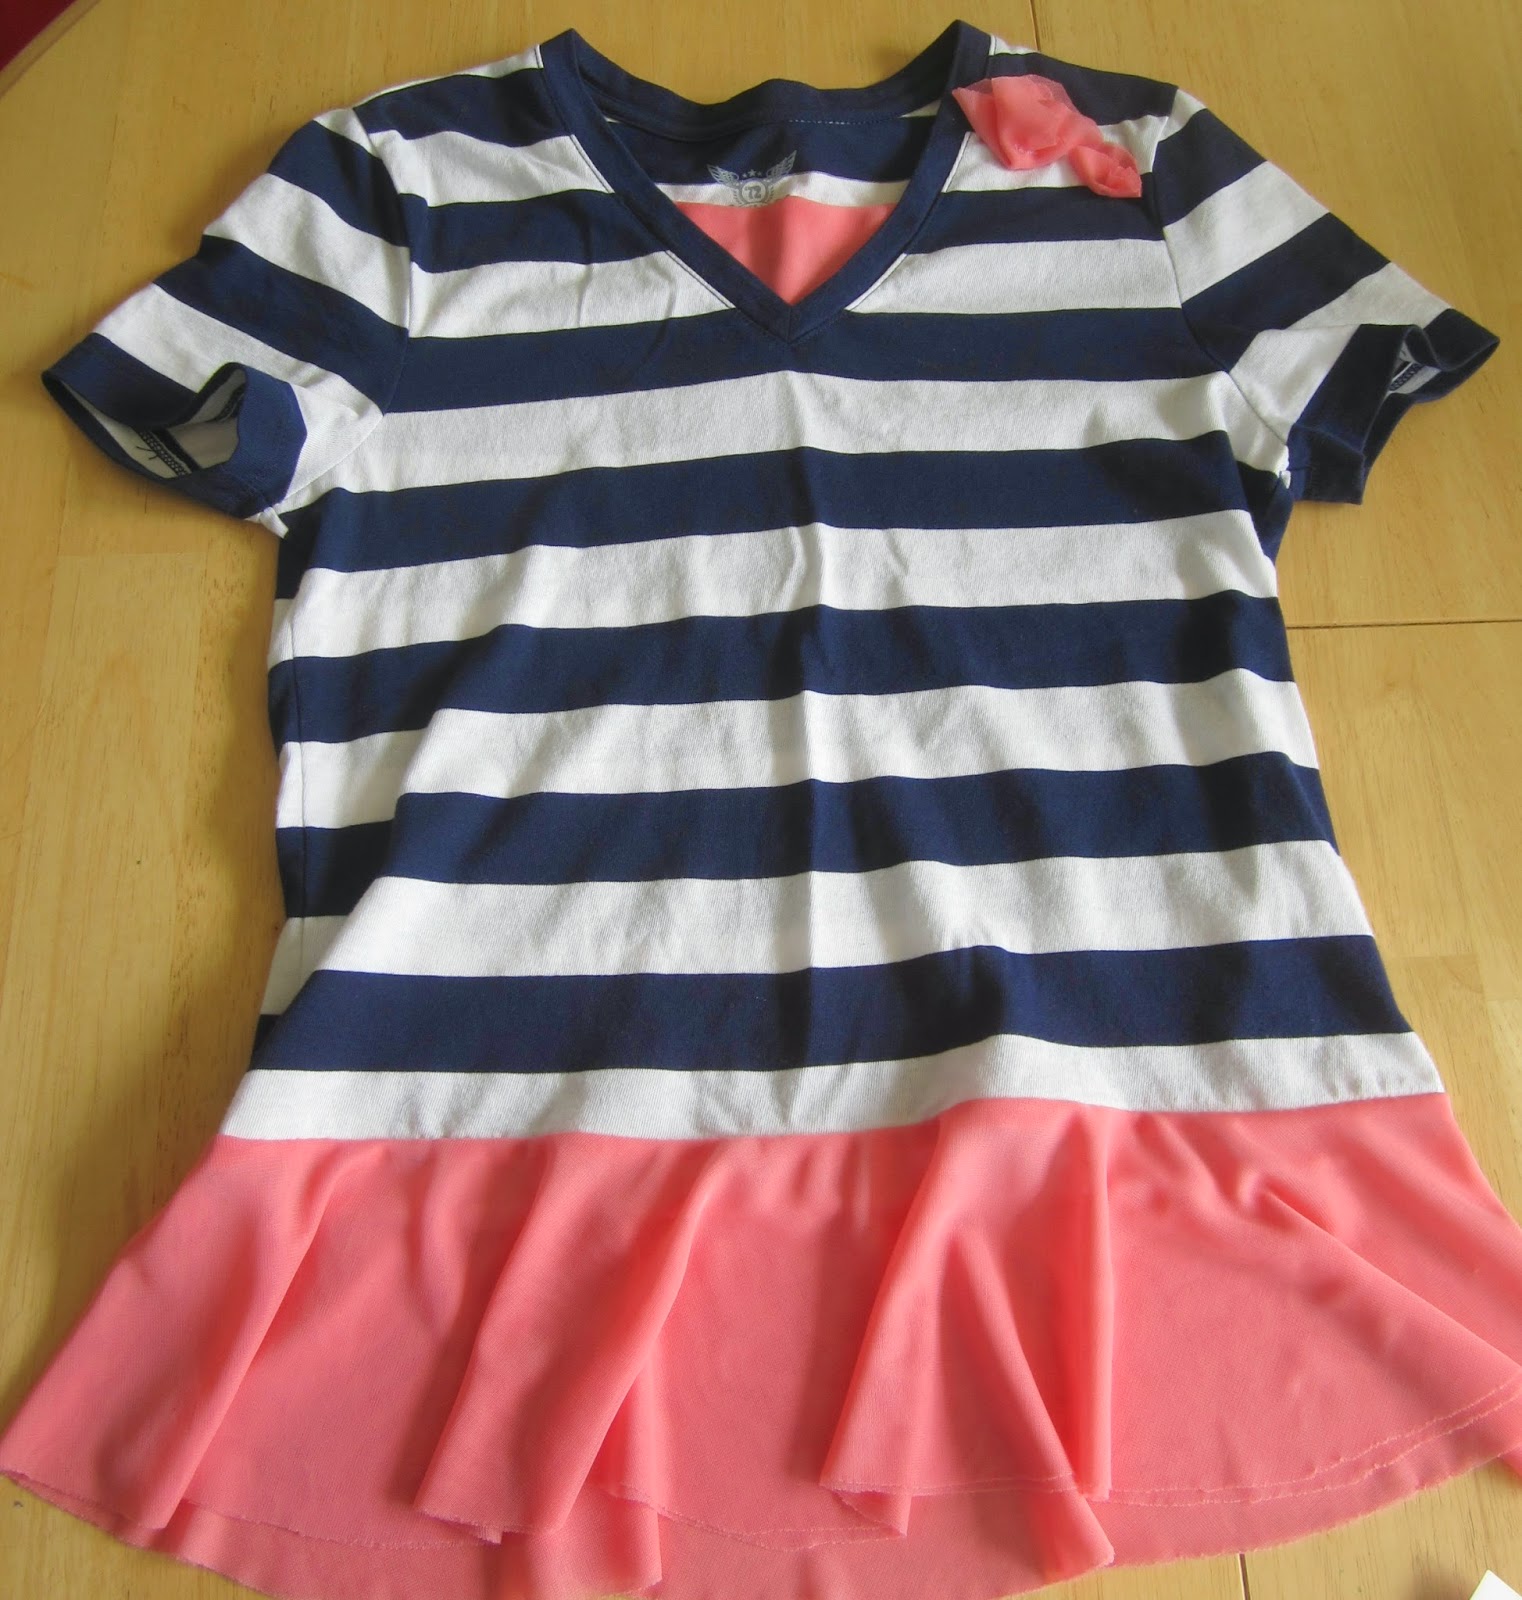
Peplum Shirt Refashion

 I decided to make matching peplum tops for my girls and I love the way they turned out.  The hardest part was figuring out the math..I may need a little refresher in Geometry.


Of course they love how flowy and twirly they are. This fabric was cheap, cheap so I bought the entire bolt...maybe I will need a matching flowy skirt.


 They went together really quickly after I figured out the math and the best part...no hemming and I even got away with no ironing :)


 I couldn't find any shirts in the little girl's section that fit the bill so I found these in the women's dept. They were a little big but I figured they could wear them longer that way.  Added a couple flowers and  just a little fabric at the top to tie in the color.


 This fabric is seriously the best..I may have to make some flowers for their hair to match.  It just ruffled up all perfect and...well flower like.
If you're interested in making a peplum top click on read more for the tutorial.

Tuesday, July 1, 2014

The Very Hungry Caterpillar Kid Craft

 Soooo summer is super busy and also SUPER FUN!! We have been having a fabulous time just chillaxin, swimming, getting sun burnt (me), making popsicles...and crafting up a storm. 
Yay us!


 My little girl has been browsing my kid craft Pinterest boards and is very ambitious...she managed to pull this one off in about an hr. We made our caterpillar out of an old oatmeal canister and painted it with acryllics.We cut all of the food out of a mixture of felt and foam...just what we had on hand.


All my kids have been enjoying this one, especially my youngest he thinks it is too fun to put the food in himself as we read through the story.


I have tons of projects ready to be posted...living room collage wall, peplum shirts for my girls, farm quiet book and curtains with DIY rods...so I will be back soon.
01 02